Google has announced new products that will run like a Ferrari on a German highway. Many of them become a great success, while others are not so lucky. One of these latest launches that has been very well received are its cardboard virtual reality viewers, Google Cardboard, which were presented at the Google I/O conference in June 2014. Today, virtual reality is an incredible experimental and innovation field for large companies.
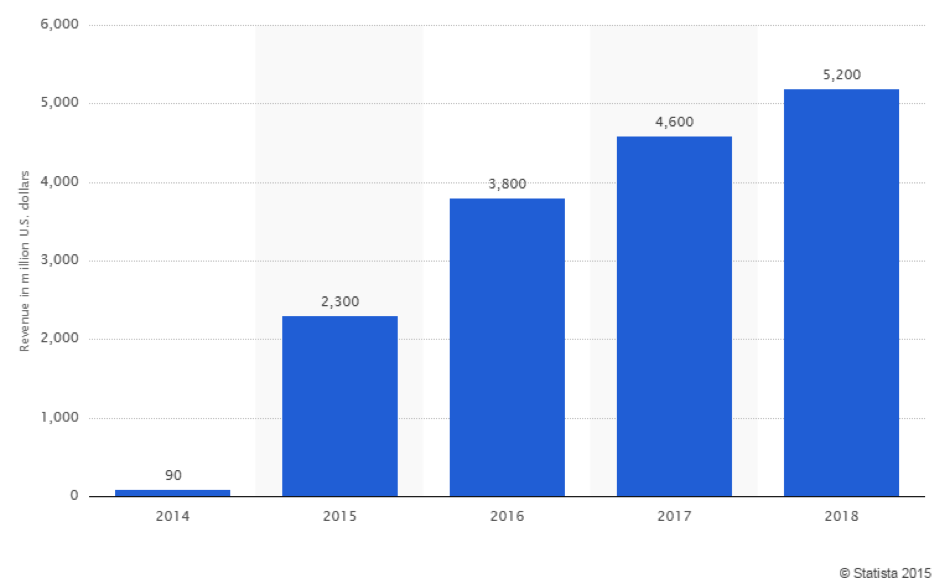
Virtual reality is a rapidly growing business sector. In fact, some reports expect a rise in revenue in 2015 well above 100% and a more moderate increase up to 2018, but even so, really interesting. The market and data portal Statista.com is forecasting that 2018 would end with revenue of 5.2 billion dollars. Progression: 2.3 billion in 2015, 3.8 in 2016 and 4.6 in 2017. This is not including the 24 million RV devices sold by 2018.
Google’s idea with Cardboard is to develop virtual reality tools accessible to all: cheap cardboard viewers, easy to set up, with a couple of folds, and a cell phone. Not more. To this end, Google provides developers with a number of application development kits (SDKs) for the Android operating system and Unity, a 3D video game development platform. The goal: To simplify virtual reality app design.
The SDK for Android
The Android SDK enables the development of applications that, using the search engine’s viewer, are capable of displaying 3D images that react to the head’s movements. The Cardboard magnet, located on the side, provides interaction with the Android smartphone, changing the behavior of the phone’s compass and enabling the virtual reality application to work properly without touching the device.
– Android smartphone with Jelly Bean or later operating system.
2. Google’s documentation provides sample GitHub code as a demo application, which needs to be cloned to start developing any project. All we have to do is run the following command when cloning this app:
3. Two more steps for creating a demo application:
– Open Android Studio and select Import Non-Android Studio Project on the Welcome page. Select the build.gradle file located on the root of the sample code files run previously and click OK. A project named CardboardSample will open in the Android Studio editor, which contains the Treasure Hunt testing app sample. The documentation’s GitHub code belongs to this app.
– Connect the Android smartphone to the computer, enable the connection selecting Run, and then click the Run CardBoardSample option to compile and run the app on the cell phone.
Developing any RV application in GoogleCardboard requires CardboardActivity, the basic activity for integrating Cardboard devices. It enables developers to create events for interacting with Cardboard and controlling some of the details of the RV experience. CardboardActivity uses the immersive full-screen mode because the RV view on the viewer only represents the graphics experience this way.
All of these graphic elements of the user interface are defined by the view of the Google Cardboard SDK for Android, the CardboardView, a specific variety of GLSurfaceView for creating 3D content.
This is how a view is defined in the Cardboard SDK:
**
* Sets the view to our CardboardView and initializes the transformation matrices we will use
* to render our scene.
* @param savedInstanceState
*/
@Override
public void onCreate(Bundle savedInstanceState) {
super.onCreate(savedInstanceState);
setContentView(R.layout.common_ui);
CardboardView cardboardView = (CardboardView) findViewById(R.id.cardboard_view);
// Associate a CardboardView.StereoRenderer with cardboardView.
cardboardView.setRenderer(this);
// Associate the cardboardView with this activity.
setCardboardView(cardboardView);
// Initialize other objects here.
…
}
4. Google also provides relevant information for developers with respect to the view representation process, the use of the onNewFrame() method for programming the visual representation’s logic, the use of the onDrawEye() method for the viewer’s configuration at eye level and the handling of the Cardboard viewer’s inputs, when the user uses the magnet to change the application’s behavior.
Whenever the developer wants to enter a different event in the application’s behavior when the user touches the side magnet, CardboardActivity.onCardboardTrigger() needs to be replaced in the app’s activity. Ultimately, this is the way of responding to specific situations.
5. How do I start creating my own app using the demo application? Download the .jar files in this sample application’s libs folder and save them to the app/libs folder of the personal app project. These lines of code are later added to the app/build.gradle file, enabling the programmer to start using the Android SDK without any problem:
The Cardboard SDK for Unity enables the creation of virtual reality experiences for both Android and iOS devices that are run on the search engine’s cardboard viewer. Some of its functions make it possible to:
– Create completely new apps with Unity or adapt a 3D application created on this platform to RV.
– Tracking of the user’s head movements..
– Stereoscopic rendering in parallel.
– Automatic stereoscopic configuration for a specific Cardboard model.
– Distortion correction for the Cardboard.
– Event and input detection for the Cardboard.
– Automatic rotation deviation correction.
– Headset parameter configuration.
– It adjusts the stereoscopic level dynamically to reduce the user’s eye strain when using the RV viewer.
– It determines the direction of the user’s gaze.
– It enables interaction with elements of the Canvas user interface using, for example, the gaze.
– It respects the camera’s zoom effects, which are compatible with the user’s head movement.
How do we start using this SDK for both Android and iOS?
There are several fixed steps when we want to develop a virtual reality application for both the Google and Apple operating systems.
Ecommerce has continued to grow steadily in Spain, except during the pandemic, which has already been overcome in terms of online shopping. Ecommerce has been making inroads among the Spanish for over two decades. In 2000, it was a marginal and niche activity. Now it is almost universal. Almost all Spaniards with internet access shop online […]
QR code payment is an alternative form of mobile payment that requires no card chip or NFC technology: just a camera and an internet connection Payments with a QR code are increasingly popular among younger consumers and tourists, as well as one of the most demanded forms of payment, especially by Chinese visitors to Spain. […]
Real-time payments have become one of the most noteworthy innovations in the financial industry. Their growth in recent years has been significant thanks to the possibilities they offer companies, especially in customer relations.
Please, if you can't find it, check your spam folder
×
The email message with your ebook is on the way
We have sent you two messages. One with the requested ebook and one to confirm your email address and start receiving the newsletter and/or other commercial communications from BBVA API_Market
×
PROCESSING OF PERSONAL DATA
Who is the Data Controller of your personal data?
Banco Bilbao Vizcaya Argentaria, S.A. (“BBVA“) with registered address at Plaza de San Nicolás 4, 48005, Bilbao, España and Tax ID number A-48265169 . Email address: contact.bbvaapimarket@bbva.com
What for and why does BBVA use your personal data for?
For those activities among the following for which you give your consent by checking the corresponding box:
to receive newsletter from BBVA API_Market through electronic means;
to send you commercial communications, events and surveys relating to BBVA API_Market to the e-mail address you have provided.
For how long we will keep your data?
We will keep your data until you unsubscribe from receiving our newsletter or, if applicable, the commercial communications, events and surveys to which you have subscribed. Whether you unsubscribe or whether BBVA decides to end the service, your details will be deleted.
How can I unsubscribe to stop receiving newsletters and/or communications from BBVA API_Market?
You can unsubscribe at any time and without need to indicate any justification, by sending an email to the following address: contact.bbvaapimarket@bbva.com
To whom will we communicate your data?
We will not transfer your personal data to third parties, unless it is mandatory by a law or if you have previously agreed to do so.
What are your rights when you provide us with your information?
You will be able to consult your personal data included in BBVA files (access right)
You can modify your personal data when they are inaccurate (correction right)
You may request that your personal data not be processed (opposition right)
You may request your personal data be deleted (suppression right)
You can request a limitation on the processing of your data in the allowed cases (right of limitation of processing)
You will be able to receive, in electronic format, the personal data you have provided to us, as well as to transmit them to another entity (portability right)
You are responsible for the accuracy of the personal data you provide to BBVA and to keep them duly updated. If you believe that we have not processed your personal data in accordance with regulations, you can contact the Data Protection Officer of BBVA at the following address dpogrupobbva@bbva.com.
You can find more information in the “Personal Data Protection Policy” document on this website.
×
PROCESSING OF PERSONAL DATA
Who is the Data Controller of your personal data? Banco Bilbao Vizcaya Argentaria, S.A (“BBVA“), with registered address at Plaza de San Nicolás 4, 48005, Bilbao, España, and Tax ID No. A-48265169. Email address:contact.bbvaapimarket@bbva.com
What for and why does BBVA use your personal data for?
For the execution and management of your request, specifically, download the requested e-book/s.
BBVA informs you that, unless you indicate your opposition by sending an email to the following address: contact.bbvaapimarket@bbva.com, BBVA may send you commercial communications, surveys and events related to products and/or services of BBVA API Market through electronic means.
For how long we will keep your data?
We will keep your data as long as necessary for the management of your request, and to receive commercial communications, events and surveys. BBVA will keep your data until you unsubscribe to stop receiving our newsletters or, where appropriate, until the end of the service. Afterwards, we will destroy your data.
How can I unsubscribe to stop receiving newsletters and/or communications from BBVA API Market?
You can unsubscribe at any time and without need to indicate any justification, by sending an email to the following address: contact.bbvaapimarket@bbva.com
To whom will we communicate your data?
We will not transfer your personal data to third parties, unless it is mandatory by a law or if you have previously agreed to do so.
What are your rights when you provide us with your information?
You will be able to consult your personal data included in BBVA files (access right)
You can modify your personal data when they are inaccurate (correction right)
You may request that your personal data not be processed (opposition right)
You may request your personal data be deleted (suppression right)
You can request a limitation on the processing of your data in the allowed cases (right of limitation of processing)
You will be able to receive, in electronic format, the personal data you have provided to us, as well as to transmit them to another entity (portability right)
You can exercise before BBVA the aforementioned rights through the following address: contact.bbvaapimarket@bbva.com
You are responsible for the accuracy of the personal data you provide to BBVA and to keep them duly updated.
If you believe that we have not processed your personal data in accordance with the regulations, you can contact the Data Protection Officer at the following address: dpogrupobbva@bbva.com
You can find more information in the “Personal Data Protection Policy” document on this website.
Banco Bilbao Vizcaya Argentaria, S.A. owner of this portal uses cookies and/or similar technologies of its own and third parties for the purposes of personalization, analytics, behavioral advertising or advertising related to your preferences based on a profile prepared from your browsing habits (e.g. pages visited). If you wish to obtain more detailed information, consult our Cookies Policy.
Cookie settings panel
These are the advanced settings for first-party and third-party cookies. Here you can change the parameters that will affect your browsing experience on this website.
Technical Cookies (required)
These cookies are used to give you secure access to areas with personal information and to identify you when you log in.
Name
Owner
Duration
Description
gobp.lang
BBVA
1 month
Language preference
aceptarCookies
BBVA
1 year
Configuration Accepted Cookies
_abck
BBVA
1 year
Helps protect against malicious website attacks
bm_sz
BBVA
4 hours
Helps protect against malicious website attacks
ADRUM_BTs
Salesforce Marketing Cloud
Session
Required for monitoring of the service, inherent to SFMC
ADRUM_BT1
Salesforce Marketing Cloud
Session
Required for monitoring of the service, inherent to SFMC
ADRUM_BTa
Salesforce Marketing Cloud
Session
Required for monitoring of the service, inherent to SFMC
ADRUM_BT
Salesforce Marketing Cloud
Session
Required for monitoring of the service, inherent to SFMC
xt_0d95e
Salesforce Marketing Cloud
Session
Remember user preferences (if any)
__s9744cdb192d044faa1bf201d29fafd1e
Salesforce Marketing Cloud
Session
Remember user preferences (if any)
wpml_browser_redirect_test
WPML
Session
Text translation in the portal
wp-wpml_current_language
WPML
24 hours
Text translation in the portal
They are used to track the activity or number of visits anonymously. Thanks to them we can constantly improve your browsing experience
Your browsing experience is constantly improving.
With your selection, we cannot offer you a continuously improved browsing experience.
Name
Owner
Duration
Description
AMCV_***
Adobe Analytics
Session
Unique Visitor IDs used in Cloud Marketing solutions
AMCVS_***
Adobe Analytics
2 years
Unique Visitor IDs used in Cloud Marketing solutions
demdex (safari)
Adobe Analytics
180 days
Create and store unique and persistent identifiers
sessionID
Adobe Analytics
Session
Launch's internal cookie used to identify the user
gpv_URL
Adobe Analytics
Session
Adobe Analytics plugin: getPreviousValue Capture the value of a certain variable in the following page view, in this case the prop1
gpv_level1
Adobe Analytics
Session
Cookie used to store the DataLayer levl1 of the previous page.
gpv_pageIntent
Adobe Analytics
Session
Cookie used to store the pageIntent of the previous page.
gpv_pageName
Adobe Analytics
Session
Cookie used to store the pagename of the previous page.
aocs
Adobe Analytics
Session
Cookie that stores the first values collected at the beginning of a process.
TTC
Adobe Analytics
Session
Cookie used to store the time between the App Page Visit event and the App Completed event.
TTCL
Adobe Analytics
Session
Cookie used to store the time between the LogIn event and App Completed.
s_cc
Adobe Analytics
Session
Determine if cookies are active
s_hc
Adobe Analytics
Session
Cookie used by Adobe for analytical purposes
s_ht
Adobe Analytics
Session
Cookie used by Adobe for analytical purposes
s_nr
Adobe Analytics
2 years
Determine the number of user visits
s_ppv
Adobe Analytics
Permanent
Adobe Analytics plugin: getPercentPageViewed Determine what percentage of the page a user views
s_sq
Adobe Analytics
Session
ClickMap/ActivityMap features
s_tp
Adobe Analytics
Session
Cookie used by Adobe for analytical purposes
s_visit
Adobe Analytics
2 years
Cookie used by Adobe to know when a session has been started.
They allow the advertising shown to you to be customized and relevant to you. Thanks to these cookies, you will not see ads that you are not interested in.
The advertising is customized to you and your preferences.
Your choice means you will not see customized ads, only generic ones.
Name
Owner
Duration
Description
OT2
VersaTag
90 days
VersaTag Cookie used to store a user id and the number of user visits.
u2
VersaTag
90 days
VersaTag Cookie where the user ID is stored
TargetingInfo 2
MediaMind
1 year
Cookie that serves to assign a unique random number that generates MediaMind.
These cookies are related to general features such as the browser you use.
Your experience and content have been customized.
With your selection, we cannot offer you a continuously improved browsing experience.
Name
Owner
Duration
Description
mbox
Adobe Target
9 days
Cookie used by Adobe Target to test user experience customization.
×
Looks like you’re browsing from Mexico, so let’s show you the custom content for your
location. Change
Looks like you’re browsing from Spain, so let’s show you the custom content for your
location. Change
Select a country
In order to access the private area and corresponding sandbox, select the country of the APIs you want to use.